Your orders carry data that WooCommerce hides from you. Delivery dates, PO numbers, gift messages, warehouse codes – they’re all stored as order meta, buried inside each order. To see any of it, you open the order, scroll down, find the field, close the order. Repeat 200 times a day.
What if that data sat right in your orders list, in its own column?
This post shows you how to create custom columns in OrderFusion for any order meta field. No code, no developer, no plugin configuration files. Five clicks and done.
What order meta actually is
Every WooCommerce order stores extra data as “meta fields.” These are name-value pairs attached to the order. Some come from WooCommerce itself (billing phone, paid date). Others come from plugins you’ve installed – a delivery date picker saves _delivery_date, a PO number field saves _po_number, a gift message box saves _gift_message.
The problem: WooCommerce doesn’t show this data in the orders list. It’s only visible when you open each order individually.
OrderFusion fixes that. You pick a meta field, give it a column name, and it appears in your orders list next to order number, status, and total.
Before you start: find your meta key
Every custom column needs a meta key – the internal name WooCommerce uses to store the data. The most reliable way to find it: check your plugin’s documentation. Most plugins list their meta keys in a settings page, FAQ, or support docs. For example, the popular Order Delivery Date plugin by Tyche Softwares uses _orddd_timestamp, not something obvious like _delivery_date.
If the docs don’t help, you can look inside an order:
- Open any order that has the data you want to display
- Scroll down to the Custom Fields section (if you don’t see it, click Screen Options at the top of the page and check the Custom Fields box)
- Look at the “Name” column – that’s your meta key
One important catch: most plugins prefix their meta keys with an underscore (like _delivery_date), and WordPress hides underscore-prefixed keys from the Custom Fields section by default. So the field you’re looking for might not appear here. That’s normal. Fall back to the plugin’s documentation or contact their support.
On newer WooCommerce stores using HPOS (High-Performance Order Storage), the Custom Fields section may not appear on the order page at all. Plugin documentation is your best bet in that case.
Whatever method you use, copy the key exactly – case-sensitive, including any underscores.
Create your first custom column
Here’s the full process. It takes about 30 seconds.
- Go to WooCommerce > Orders
- Click Screen Options (top-right corner)
- In the Columns section, click the + button
- Fill in the form:
- Column Name: What you want the header to say (e.g., “Delivery Date”)
- Meta Key: The exact key from the step above (e.g.,
_delivery_date) - Column Type: How to format the data – Text, Number, Date, or Yes/No
- Click Create Column
- Check the new column’s box to enable it
- Close Screen Options
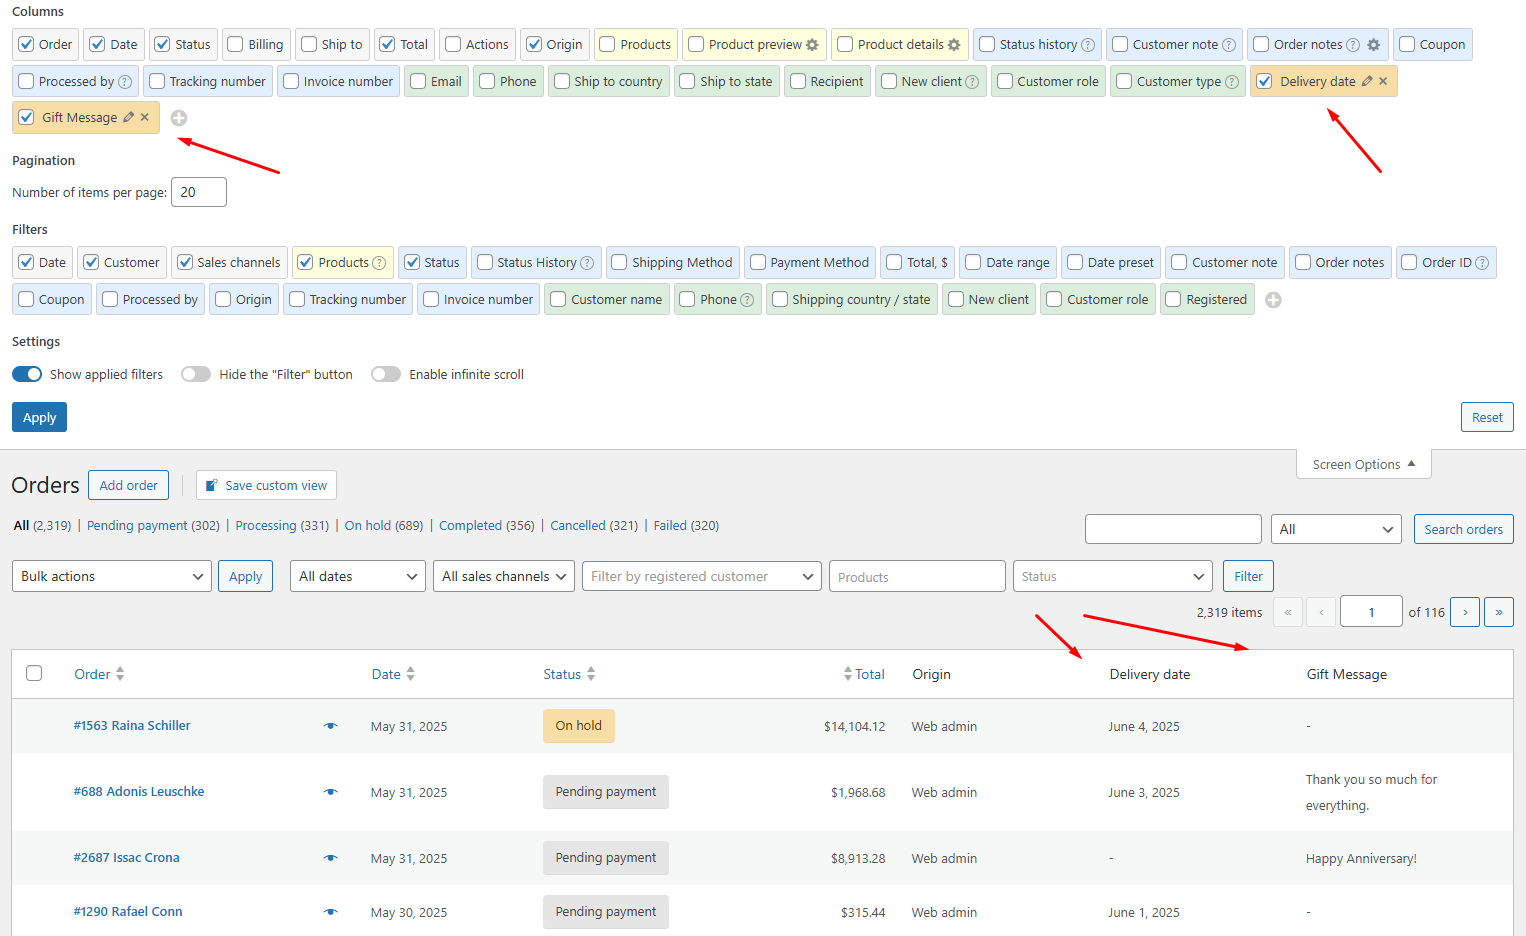
Your column appears in the orders list immediately.
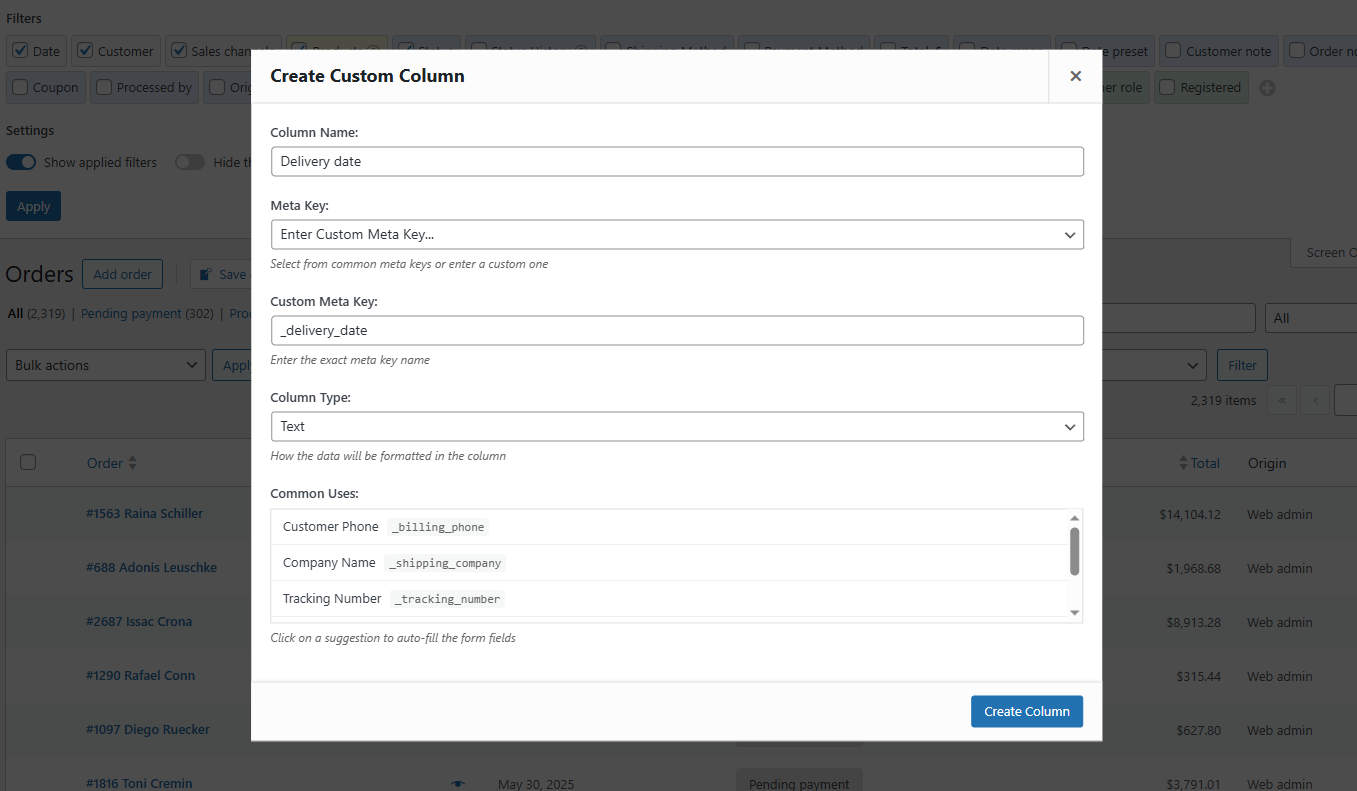
Tip: OrderFusion offers common meta key suggestions when you click
the + button. Click a suggestion to auto-fill the form.
Picking the right column type
The column type controls how OrderFusion displays the raw meta value. Pick the wrong one and dates show as Unix timestamps, yes/no fields show as “1” and “0.”
Text – Default. Shows the raw value as-is. Works for PO numbers, gift messages, notes, codes. Use this when nothing else fits.
Number – Formats numeric values. Good for quantities, weights, or amounts stored without currency symbols.
Date – Converts timestamps and date strings into readable dates. If your delivery date plugin stores 2025-03-15 or a Unix timestamp, this column type turns it into a clean, human-readable format.
Yes/No – Converts 1/0, yes/no, or true/false values into checkmark icons. Perfect for “Gift wrap requested?” or “Fragile?” or “Insurance added?” fields.
Want to try this yourself? Install OrderFusion Lite (free) and start filtering orders in minutes. Need saved views, custom meta columns, or Products & Coupons page support? See OrderFusion Pro.
Three columns worth building today
Here are three custom columns that save real time for real stores. Each one replaces something you’re probably doing by hand.
1. Delivery date
If you use a delivery date picker plugin at checkout, customers choose when they want their order delivered. That date lives in order meta. Without a column for it, your fulfillment team opens every order to check the delivery schedule.
- Column Name: Expected Delivery
- Meta Key:
_delivery_date(check your plugin’s documentation) - Column Type: Date
Now your fulfillment team sees delivery dates at a glance. Sort by the column to process today’s deliveries first.
2. PO number
B2B stores and wholesale accounts often require purchase order numbers for invoicing and payment tracking. Customers enter a PO number at checkout, and your accounting team needs it to match invoices to payments.
- Column Name: PO Number
- Meta Key:
_po_number(varies by plugin) - Column Type: Text
No more opening orders one by one just to copy a PO number into your accounting software.
3. Gift message
Stores that offer gift messages need to see them before packing. A fulfillment worker who misses a gift message ships the item with a price tag visible and no card included. That’s a bad customer experience you can avoid.
- Column Name: Gift Message
- Meta Key:
_gift_message(varies by plugin) - Column Type: Text
Now the message is visible in the orders list. Your packing team scans for non-empty values and includes the card.
Combine custom columns with views
Custom columns become more useful inside saved views. A view captures your complete workspace – columns, filters, sort order – and restores it with one click.
Example: build a “This Week’s Deliveries” view.
- Create a custom “Expected Delivery” column (as described above)
- Create a custom “Delivery Date Range” filter (click + in the Filters section, same meta key, type: Date range)
- Enable both the column and the filter
- Set the filter to this week’s date range
- Add built-in columns: Order #, Customer name, Products
- Click the + in the custom views block above the orders list
- Name it “This Week’s Deliveries” and save
Your fulfillment team loads this view every morning with one click. The delivery date column shows when each order needs to arrive, and the filter hides everything outside this week.
Pin the view for faster access. It shows as a badge above the orders list with a live count of matching orders – like “(12) This Week’s Deliveries” – so your team sees at a glance how many orders need attention today.
Managing your custom columns
A few things to know once you start building columns:
Edit anytime. Click the column name in Screen Options to reopen the form. Change the name, meta key, or type.
Delete when done. Click the delete icon next to the column name. The data stays in your orders; only the column display disappears.
Reorder freely. Hover over any column in Screen Options and drag the move icon. Place your most-checked custom columns on the left side of the table.
Team visibility. Every team member sees your custom columns and can enable them. Only you, the creator, can edit or delete them.
When a column shows blank
The most common issue with custom columns: every cell is empty. This almost always means the meta key doesn’t match.
Fix it:
1. Open an order you know has the data
2. Scroll to Custom Fields
3. Copy the exact meta key (watch for underscores and capitalization)
4. Edit your custom column to use that exact key
If Custom Fields shows nothing for that order, the data might not exist yet. A “Tracking Number” column shows blank because no tracking numbers have been entered. That’s normal – the column populates as data gets added.
Try it yourself
Build one column right now. Open Screen Options, click the + in the Columns section, and create a column for any meta field your store uses. The whole process takes 30 seconds.
Want to see it in action first? Try it on the demo. The demo has sample orders with meta fields ready to go.
For the full column reference and troubleshooting, check the OrderFusion documentation.