Every month, someone on your team exports orders to CSV. And every month, they forget which columns to include.
The accountant gets a file with shipping addresses but no payment methods. The warehouse lead gets totals and coupons but no product details. You spend 10 minutes re-exporting with the right columns, and the cycle repeats next month.
This post gives you three ready-to-use export setups for the tasks store teams run most often: accounting reconciliation, fulfillment handoff, and management reporting. Set each one up once, save it as a view, and never rebuild a column set from scratch again.
How OrderFusion exports work (30-second version)
OrderFusion exports exactly what you see. The columns visible in your orders list become the columns in your CSV file. The filters you’ve applied determine which orders get included.
That means export setup is really just list setup:
- Pick your columns in Screen Options
- Apply filters (date range, status, whatever you need)
- Open Bulk actions, select Export All to CSV, click Apply
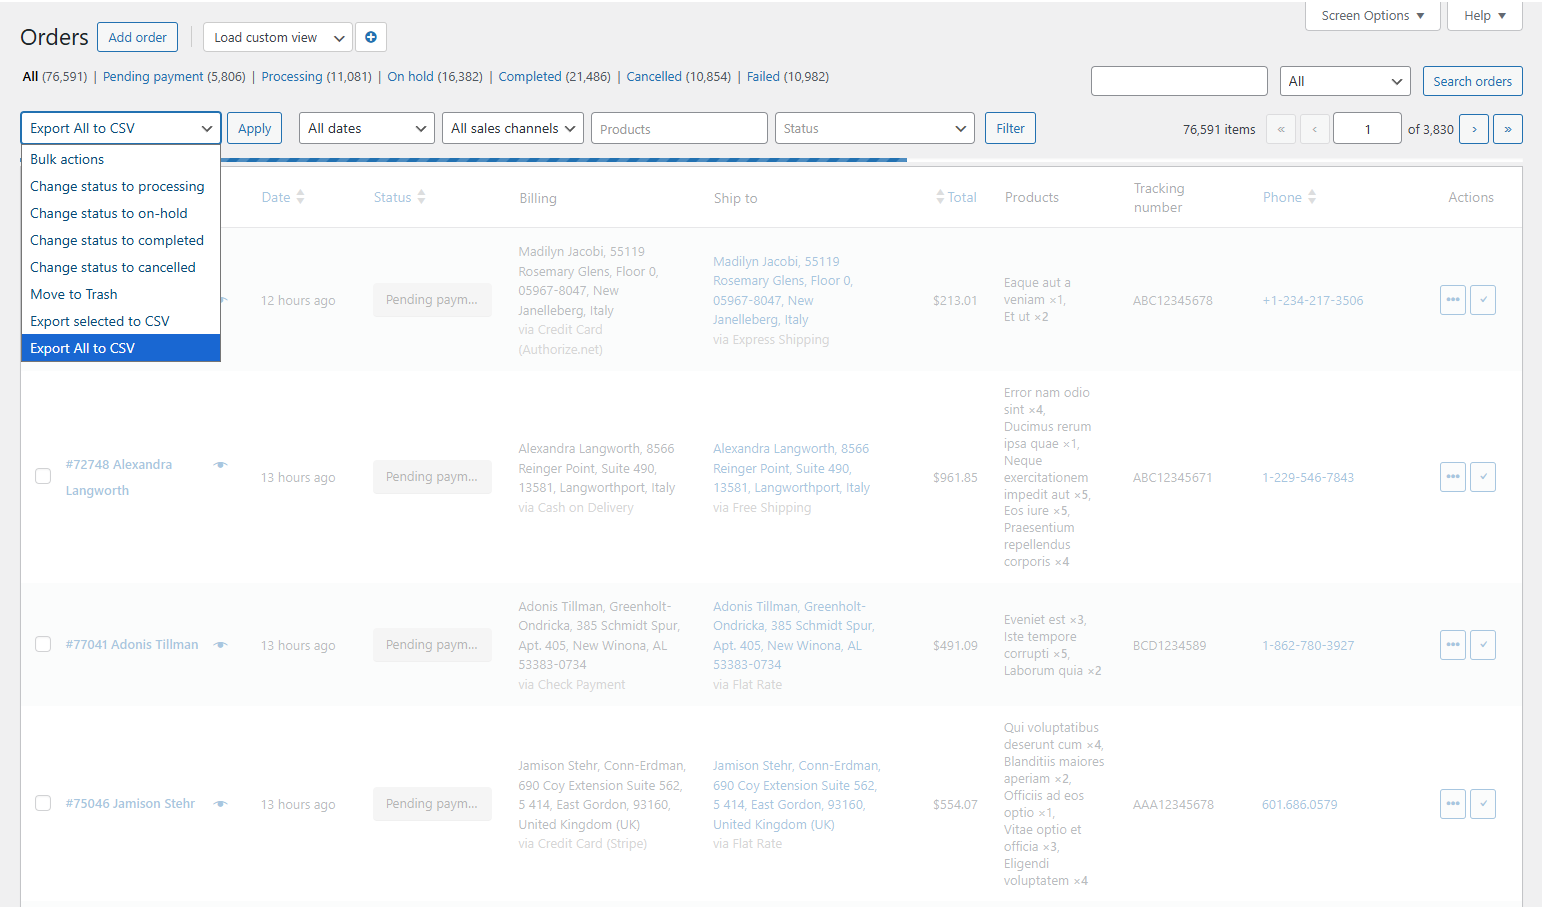
Your browser downloads the file. Done.
The trick is not doing this from scratch every time. Save your column and filter combination as a custom view, and next month you load the view, adjust the date range, and export. Two clicks instead of twenty.
Before you start: choose your CSV format
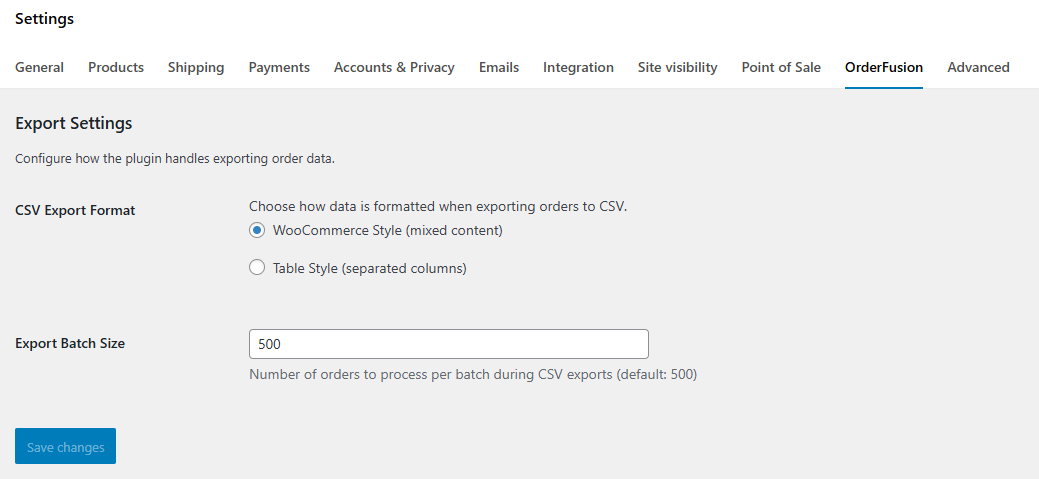
OrderFusion offers two CSV formats. Pick the right one before exporting, because it changes how your data splits across columns.
Go to WooCommerce > Settings > OrderFusion tab and find the CSV Export Format option.
WooCommerce Style (mixed content) combines related fields. The Order column includes both the order number and customer name. Billing and shipping details group together. More compact, fewer columns.
Table Style (separated columns) gives each piece of data its own column. Customer name, payment method, and shipping method each get a dedicated column. Better for sorting and filtering in spreadsheets.
For accounting, use Table Style. Accountants need to sort by payment method and match customer names to invoices. For fulfillment, either works. For reporting, Table Style makes pivot tables and formulas easier.
Playbook 1: monthly accounting export
Your accountant (or your bookkeeper, or you at 11 PM) needs a clean file to reconcile orders against bank deposits and invoicing records.
Columns to enable
Open Screen Options and check these columns:
- Order (order number + customer name)
- Date
- Status
- Total
- Payment method
- Coupon (tracks discounts applied)
- Invoice number (matches your invoicing plugin’s records)
With Table Style CSV format, payment method and customer name each get their own column in the export, which makes sorting and matching in your spreadsheet straightforward.
Disable everything else. Your accountant doesn’t need shipping addresses or product thumbnails.
Filters to apply
- Date range: First day to last day of the month
- Status: Completed (and Refunded, if you reconcile refunds separately)
Save as a view
Click the + button in the custom views block. Name it “Accounting – Monthly.” Now it’s one click to load next month.
The monthly routine
- Load the “Accounting – Monthly” view
- Adjust the date range to the current month
- Bulk actions > Export All to CSV > Apply
- Send the file to your accountant
That’s it. Same columns, same format, every month.
Want to try this yourself? Install OrderFusion Lite (free) and start filtering orders in minutes. Need saved views, custom meta columns, or Products & Coupons page support? See OrderFusion Pro.
Playbook 2: fulfillment handoff
Your warehouse team (or your 3PL, or your shipping partner) needs order details and addresses to pick, pack, and ship.
Columns to enable
- Order (order number + customer name)
- Products (text list – shows item names and quantities)
- Ship to (full shipping address)
- Phone (courier needs this for delivery issues)
- Ship to country
- Ship to state
For the Products column, the text list format works best for CSV exports. It gives a comma-separated list like “Blue T-Shirt x2, Red Mug x1” that’s easy to read in a spreadsheet cell.
If you use Table Style CSV format, the export also separates customer name and shipping method into their own columns, which helps when you need to sort or filter the file after download.
Filters to apply
- Status: Processing (orders paid and ready to ship)
No date filter needed here. You want all orders currently waiting for fulfillment, regardless of when they were placed.
Save as a view
Name this one “Fulfillment – Ready to Ship.” Your warehouse lead loads it at the start of each shift, exports, and uploads the CSV to your courier’s bulk import system.
Tip: batch by country
If you ship internationally and use different carriers for domestic vs. international orders, add a Ship to country filter. Export domestic orders first, then switch the country filter and export international orders. Two files, two carrier uploads, zero manual sorting.
Playbook 3: weekly management report
You want a broader view: what sold, who bought it, how much revenue came in, and where problems sit. This export feeds a spreadsheet dashboard or a weekly team review.
Columns to enable
- Order (order number + customer name)
- Date
- Status
- Total
- Products (text list)
- Coupon
- New Client (shows whether each order came from a first-time or returning customer)
- Ship to country
This is the widest column set of the three playbooks. That’s fine for reporting. You’re analyzing, not handing this to a courier or an accountant.
Filters to apply
- Date range: Last 7 days (or last 30 days for a monthly review)
- Status: All statuses (you want the full picture, including failed and refunded orders)
Save as a view
Name it “Weekly Report” or “Management Overview.”
What to look for in the export
Open the CSV in Google Sheets or Excel and check:
- Revenue by status: Sum the Total column grouped by Status. How much is completed vs. still processing vs. refunded?
- New vs. returning: Filter the New Client column. What percentage of this week’s orders are first-time buyers?
- Coupon usage: Filter for non-empty Coupon values. Are discounts eating into margins more than expected?
- Geographic spread: Sort by Ship to country. Are you seeing growth from a particular region?
None of this requires a BI tool. A spreadsheet with filters and a few SUM formulas covers it.
Reuse views, stop rebuilding
The common thread across all three playbooks: save your setup as a view. Views store columns, filters, sorting, and filter values. Load the view, adjust the date range, export. That’s the whole workflow.
If different team members need different exports, that works too. Views are shared across the team, so your accountant, warehouse lead, and store manager can each load their own view on the same Orders page without interfering with each other.
Pin the views you use most often. Pins are personal, so each team member controls their own. Pinned views show as badges above the orders list with live item counts, so you can see at a glance how many orders match each view before you load it.
Try it with your own orders
The fastest way to build these playbooks is to try them on real data. Open the OrderFusion demo and set up an accounting view with five columns and a date filter. Export it. The whole process takes about two minutes.
Then read the full CSV export documentation for details on batch sizes, encoding, and troubleshooting.